 English
 Deutsch
 日本語
日本語 简体中文
简体中文
Real light

In set.a.light 3D you will find a collection of studio equipment and
various light shapers. For the very first time, real light data is used
in software for photographers in order to simulate the realistic
dispersion behaviour of the lighting technology. The software’s
complex algorithms realistically simulate the behaviour of the
lighting technology and also enable real-time light simulation and
high-speed rendering of the generated photos.
Placing a light source in the studio area
To place a light source in the studio area, drag and drop it from the
studio library into the studio area or place it by double-clicking on
the tile. If a model already exists in the studio, the light source automatically
aligns itself to the model. With the help of the yellow
touch elements you can change the orientation of the light source,
move it in the room or adjust the height.

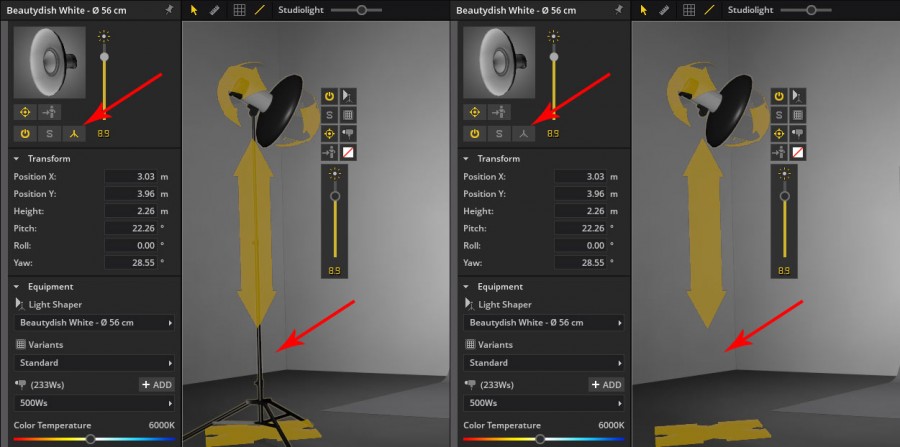
Tripod / Boom Stand / C-Stand
We have decided to not simulate a Boom Stand in set.a.light 3D
There are many different Boom Stands (and ceiling rail systems), so it is difficult to find a universal shape that is useful to everybody.
It is also quite difficult to position a boom stand in 3D, which would not make working more intuitive.
Solution:
Simply hide the existing tripod. You can see how to do this in the picture below.
As a photographer, you will of course later know exactly how to place the light shaper in the appropriate place.
Flash light (Strobe light)
Das Quick-Menu

A selected light shaper can be edited directly via the quick menu
in the set or in the detail settings – so you always have direct access
to the most important functions.
![]()
If the “Target lock” is active, the light source remains directed
at the focused object when moving in the studio area. If
the button is inactive, the light source remains straight when
moving.
Light shaper detail settings

- Pins the window, keeping it in
the foreground no matter what
is clicked in the studio area. - Adjust output
- Aligns the light shaper to the
model - target lock – see above
- On/Off switch
- Single mode – If this function is
active, only the light from this
light source is visible. - Show/hide tripod
Transform – You can change the position of the light source in the
room using the settings in the “Transform” section.
![]()
Light Shaper – You can make changes to the light shaper and the
light source using the settings in the “Light shaper” section.


The modelling light
The modeling lamp is a dark continuous light source in the flash
head. Since the modeling light is very weak compared to the flash,
it usually has no effect on the image when the flash is used. The
modeling light only becomes visible at very long exposure times
(or high ISO).

a)The “Prop” option:
The “proportional” option means that the intensity of the modeling
light is controlled proportionally to the flash output.
b)The option “Full”:
The option “full” means that the modelling light always illuminates
with full energy (approx. 300 Watt).
c)Setting the color temperature:
You have the possibility to adjust the color temperature of the
modeling light. The default setting is 3200K.
Editing a light shaper

If there are further attachments or coverings available for the
selected light former, these can be edited in the detail settings or
directly in the studio area via the Quick menu.
Changing the flash head

Hier lässt sich die Lichtleistung des
Blitzkopfes auswählen.
Note: If you want to use a flash head with another power, you
can add your own flash head.
Add your own Flash Head
There are two ways to add your own flash head:
1: In the menue bar, click on “Edit”, then on “Add Flash Head”

or
2: Click on the “+ ADD” button (![]() ) in the detail settings in the
) in the detail settings in the
“Light shaper” area.

A window pops up, where you can add the flash head. In the field
“Enter Name”, you can add an individual name.

The next step is to choose the “control range” which matches
your flash head, from the dropdown menu. The last step is to
select the “power” (watt-second, Ws) in the dropdown menu on
the right side. By clicking on “Add“, the created flash head is
saved and added to the list of flash heads. Here it can be selected
later. “
Note: For some control ranges the selection of the power is
not necessar, since the power had been already been set by
the control range and pre-selected appropriately.
Note: If you change the power from e.g. 5 to 6, the brightness
changes an aperture stop. An integer is always equal to
one aperture stop.
The Gobo-Projector
With the gobo projector, patterns can be flashed using “gobos”
(black/white masks/stencils). You can choose from pre-designed
templates or import your own design.

The Gobo has the same functionality as the flashlights. In addition,
you can adjust the opening angle of the Gobo.

Create your own template (Gobo Mask):
1. Create a square graphic with max. 3000 px (1200 px are ideal).
2. Fill the graphic with black.
3. Now insert the pattern you want to project with white color.
4. Save the graphic as .jpg or .png and import it into set.a.light 3D
in the “Gobo Mask” area.
Note: Black does not let light through, white color lets light
through.
Attention: Colored graphics are NOT supported! With .png
no transparencies may be used for the Gobo. Only black and
white templates without transparencies are supported.
Important: A black frame must always remain around the
pattern. The white color may never reach the edge of the
graphic.
Example:

Speedlights/On-Camera Flash
The Quick-Menu of the Speedlight (On-Camera Flash)

Note: The zoom range can ONLY be changed with On-Camera
Flashes without a light shaper.
For On-Camera Flashes with a light shaper:
In order to achieve a similar light situation in the real shooting
as in the software, set the zoom value of your On-Camera
Flash to 24mm or 35mm. (This zoom range is the base
for the available On-Camera flashes with light shaper in
set.a.light 3D.)
Add Your Own Speedlight
There are two ways to add your own speedlight:
1: Click on “Add Speedlight” in the menu bar under “Edit”.

oder
2: Click on the “+ ADD” button (![]() ) in the detail settings in
) in the detail settings in
the “Light shaper” area.

Now a menu opens in which you can create the speedlight. In the
field “Enter name” you can first enter the name for the new flash.

1. Determine Control Range:

Find the dropdown menu in the left area of “Control Range” and
choose the matching control range for your speedlight from there.
2. Determine Zoom Area:

Select the zoom area matching your speedlight from the dropdown
menu.
To ensure that your flash features all zoom levels equivalent to
your real device later on, you should also pay attention to intermediate
values.
3. Determine Guide Number:

The guide number is the output rating of your speedlight.
Select the guide number (the available choices are already preselected
in accordance to your previously given information) from
the dropdown menu that matches your real device. The guide
number always refers to a certain mm specification (e.g. 35mm
or 105mm). Make sure to choose the correct value. The appropriate
value can be found in the manufacturer’s specifications of your
device.
Clicking on “Add” saves the newly created speedlight and adds it
to the list of flash heads. Later you can choose from there.
The Light Blaster
The Light Blaster is a slide projector attachment for strobes. You
can find it in the studio library in the tab “Speedlights”. It is ideal
for projecting backgrounds of all kinds. You work with it creatively,
as well as experiment with it and even transform reality into a fantasy
world. All you need is the Light Blaster, a strobe, a lens and a 35 mm
slide with the desired picture
Here are more informations about the real Light Blaster:
https://spiffygear.com/light-blaster

Set the Light Blaster correctly:
1. Place the Lightblaster in the set.
2. Choose a Speedlight as light source in the detail settings.
3. Choose an image template or add your own.
4. Adjust the luminosity of your lens.
5. Change the projection size by adjusting the focal length of your
lens.
The projection area:
The distance to the projection area and the focal length of the
lens determine the size of the projected image. The wider the lens
angle, the larger the slide will be projected. A long focal length
therefore results in a small image of the projection.
Important: Due to the Light-Blaster’s architecture a lot of
light gets lost. Therefore it can be helpful to use bright and
high-contrast images and, if necessary, a higher ISO and
open aperture for the camera settings.
Please also keep in mind that the speed of your lens has a
big influence on the brightness of the projected image. Note
also: The larger the projection area, the darker the image will
be, because the light of the speedlight has to illuminate an
ever larger area.

Sharpness control + manual focus:
As long as you don’t activate “Use manual Focus”, the Light
Blaster automatically focuses at the center of the image (where
the laser pointer hits). If you want to set the focus point yourself,
activate “Use manual Focus”. Now you can adjust the sharpness of
the projected slide using the manual focus of the lens.

Motiv-Beispiele:
Tips for the right choice of images:
Dark colours let little or no light through, bright colours let
much or very much light through.
Add your own image templates:
It is ideal if you use a JPG file in the format 2:3 (35mm slide).
Maximum image size: 2048 px long edge
Continuous Light (PERMALIGHT)
Continuous lights can be handled in set.a.light 3D in the same way
as strobe lights or speedlights.
You will find a constantly growing collection of practicals like
various pendant lamps, ceiling lamps, hanging lamps, light bulb, bedside lamps, floor lamp, desk lamp, candles.

Helper

Among the helpers, you will find the background system/cove, various
brighteners and screens. These can be edited in the detailed
settings if necessary.


Background/Cove
The sizes and colour of the background
can be edited as required in
the detailed settings and saved as as
template.

Reflectors and Light Blockers
You can adjust the size of the reflectors and
the ight blockers in the detailed settings.
Diffusion Panels (Scrims) for soft light
You wanted it, we made it work! Shaping the light through a scrim is essential especially for filmmakers, as it can transform a hard light into a diffused light.
You can find the diffusion panel in the studio library in the section “helpers”. It`s a multifunctional tool, that means that you can adjust it to your needs by determining the size and density in the detailed settings. The tripod can be hidden.
(A powerful graphics card is recommended).
