 English
 Deutsch
 日本語
日本語 简体中文
简体中文
Set list
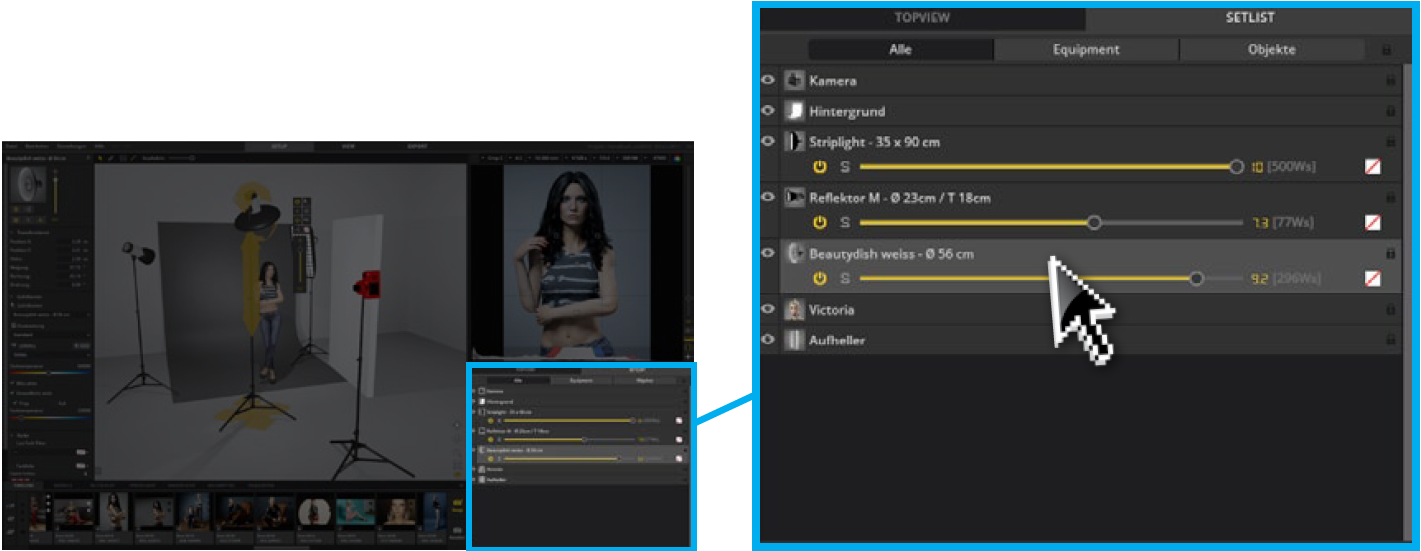
In the set list, everything that is placed in the studio area is listed
and can be selected in the list. By clicking on the eye symbol you
can show or hide individual objects. By clicking on the lock symbol
you can lock or unlock individual objects. In addition, the set list
offers you quick access to technical lighting settings (see graphic).

1. If this tab is active, everything
placed in the studio will be shown
in the setlist.
2. If this tab is active, only the equipment
is shown in the set list.
3. If this tab is active, only objects in
the set list are displayed.
4. Locks or unlocks everything in the
set list
5. Locks or unlocks a single entry in
the set list
6. Indicates whether a color gel or
which color is used.
7. Indicates the output power in Ws.
8. Displays the currently set power.
(Speedlight excluded)
9. Power controller
10. Single mode on/off
11. Flash on/off
12. Show/Hide

Permanent lights are displayed in red in the set list.
Renaming an object in the set list
We recommend to rename the objects according to their content.
Try to choose meaningful names so that you can easily distinguish
the placed objects from each other.
To do this, proceed as follows:
1. Double-click on the text field of the object in the set list and
enter a new name.
2. Press the “Enter” key to confirm your entry and leave the input
window.
Note: The changed names are also adopted on the set plan.
Locking and unlocking an object
Objects can be locked in the set list so that they are no longer
accidentally moved in the studio area. If an object is locked, a lock
icon is displayed to the right of the object name.
To lock or unlock an object, proceed as follows:
Click on the lock symbol at the right end of the set list entry. Click
the lock icon again to unlock it.
Locking and unlocking multiple objects
1. Click on a setlist entry and select the other entries to be locked
by holding down the Ctrl key (Mac: cmd).
2. Now click on one of the lock symbols to the right of the selected
objects. Click on one of the boxes again to unlock it.
Locking and unlocking all objects
1. Click on the lock symbol in the upper right corner above all setlist
entries to lock all objects at once. Click on the lock again to
unlock the objects.
Show or hide objects
Click on the eye symbol (![]() ) next to an entry in the set list to hide
) next to an entry in the set list to hide
individual objects. Click it again to show the object again.
Note: Invisible objects are not displayed in the set plan.
Timeline

The timeline presents your virtual shoot procedure in set.a.light
3D and contains all the images taken during a shoot. Each image
that appears in the timeline is automatically linked to the setup
and can be loaded by double-clicking again in the studio area at
any time.
Loading a set from the timeline
To open a setup from the Timeline in the Studio, click on the icon (
![]() ) at the bottom left of the tile.
) at the bottom left of the tile.

Note: Double-clicking on an image opens it in the View module.
Sorting timeline entries
Timeline entries can be dragged or re-sorted by pressing the left
mouse button to a new position. The yellow line indicates the
future position. Upon releasing the mouse button, the entry will
be stored at this position.

Change Apply
 If a setting in the Timeline is set up in the studio,
the “Apply” button appears as soon as a change is
made to the set. With a click on the button, the
made change is taken over into the timeline entry.
Timeline Quick Tools
In the Timeline you will find a lot of useful buttons.
![]()
![]()
Add .set file – To add the contents of another .set file to the
open .set file, click the “.set Add File” Icon at the left side of
the timeline. Then click on “Browse” in the context menu and
select the appropriate file in the file browser. Then click on
“Add”. The entries of the added .set file will be added to the
end of the timeline.

![]()
Render selection – Click the “Render selection” icon to start
the rendering process of the selected images with a single
click.
![]()
Render all snapshots – Click the “Render all snapshots” icon
to render all snapshots in the timeline.
Star rating
Star ratings help you to manage your setups. Ratings can be changed
at any time.
Setting star ratings in the timeline

To rate a timeline entry, click on one of the
three stars in the upper right corner of the tile.
If you click on the first star (from below), you
assign a rating star, if you click on the second
star, you assign two rating stars, and so on. To
remove a set rating, click on the setted rating
stars again.
Filter by star rating in the timeline
![]()
Click on one to three stars to filter all timeline entries with
this criterion to be displayed in the timeline. You can cancel
the selection by clicking on the stars again or by clicking on
the eye icon at the bottom to remove the filter.