
 English
 Deutsch
 日本語
 简体中文
 Français


How the school account works
In the school account on elixxier.com, you manage all set.a.light 3D licenses at your school or university yourself. You create groups for classrooms, teachers and student devices, assign the licenses, block the Community and content with nudity if needed, and release licenses for new students. You don’t need to contact us for day-to-day management.
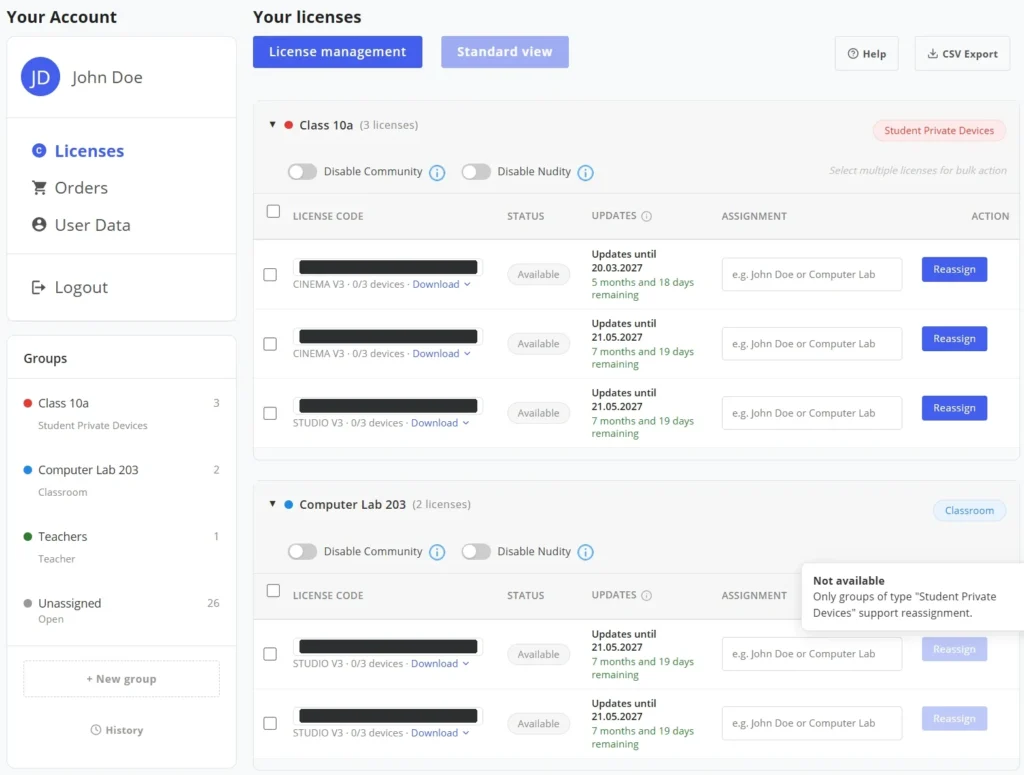
Example view of the license management.
Your school account in three steps
1. Buy licenses
By quote and invoice with volume pricing, or directly in the shop with an EDU code. Use the same customer account for all purchases; it will later become your school account. You will find everything about pricing and purchasing on the Educational institutions page.
2. Get your school account enabled
Send us a quick message via the form below or at support@elixxier.com. We will enable your customer account as a school account. You will then find the license management under Licenses.
3. Set up and activate
Create groups, assign the licenses and only then activate the computers. That way, groups and restrictions apply right from the start.
What the school account can do

Groups for every purpose
Use + New group to create groups and choose the right type:
- Student Private Devices: for licenses that students use on their own computer or at home. Only this type supports releasing a license for the next student.
- Classroom: for permanently installed computers in the classroom or computer lab.
- Teacher: for teachers, lecturers or demo computers.
For each group, you can block the Community and content with nudity (Disable Community, Disable Nudity). The setting automatically applies to every license you move into the group.
Assign licenses and download the software
When you first open it, all licenses are listed under Unassigned. Select one or more licenses using the checkboxes and click Assign here on the group you want. In the Assignment field, you can enter a name or note, for example the student’s name or the room number. Only enter it once the license is in its group: the field is cleared when the group changes.
Below each license code, Download gives you the installers for Windows and macOS as well as the Asset Library.
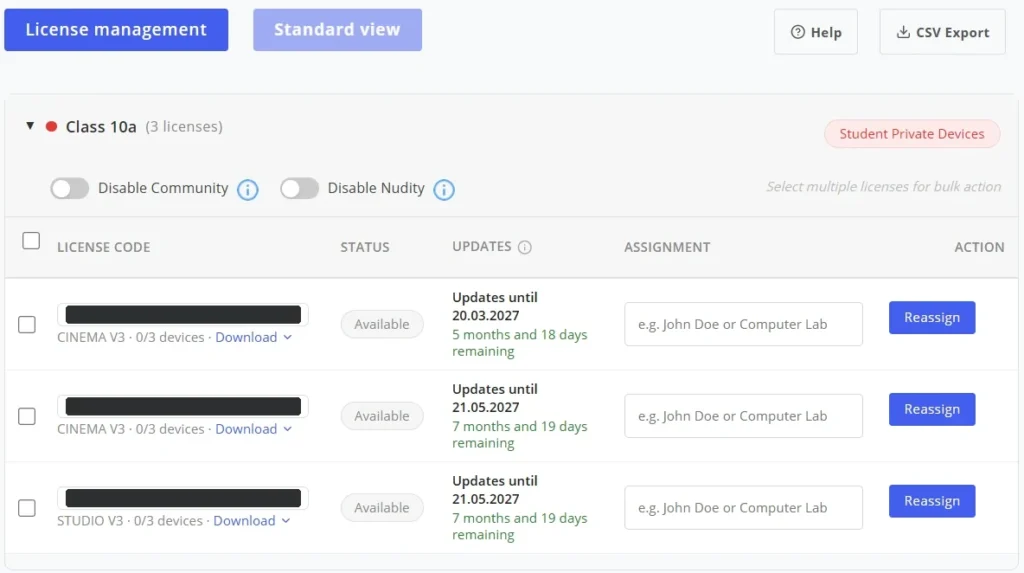

Release licenses for the next student
If a student leaves the school or the school year ends, you release their license yourself: click Reassign next to the license, optionally enter the next student’s name, confirm the security prompt and click Release license. To release several licenses at once, use Reassign selection.
The previous license is deleted and replaced with a new one. The previous student loses access the next time they start the software. To make sure this works reliably, licenses in the Student Private Devices group check online at startup whether they are still valid. The student devices therefore need an internet connection at startup.
View activations and reset devices
Clicking the status of a license, for example “2 activated”, shows all devices on which it is active. There you can reset individual activations or all of them at once.
This is intended for devices that are no longer reachable because they have been reinstalled, are defective or you no longer have access to them. If the software is still installed on the device, it will activate itself again the next time it starts. So to pass a license on to another student, always use Reassign.

CSV Export
Use CSV Export at the top right to download a list of all licenses, with license codes, groups, status and assignments.
History
Under History, you can see all previous releases and search by license code, group or student name.
License model
A school license covers one workstation. Anyone who works on that computer may use the software. There is no license server for your school network, so there are no floating or campus licenses either: you need as many licenses as there are computers running set.a.light 3D.
Licenses come in three variants, and we can also change them later on request:
- Single licenses: one license code per computer. Ideal for teachers and students’ private devices, because you can assign and release each license individually.
- Multi-activation license: one license code with multiple activations, for example for all computers in a computer lab. The settings for Community and nudity then apply to all computers using this license. We will set up a multi-activation license for you on request.
- Mixed setup: for example, a multi-activation license for the computer lab and single licenses for the teachers.
Installation, activation and updates
How do we install set.a.light 3D on the school computers?
Download the installers for Windows and macOS in the school account, via Download below the license code or in the Standard view. You can distribute the installer to all computers via USB stick or over the network; you don’t need to download it again for each computer.
How do we activate the software?
Start set.a.light 3D and enter the license code under Help › License software. The computer needs access to our license server for activation and after every update. For computers with no internet access at all, get in touch with us. The software applies changes made in the school account, such as blocking nudity, the next time it starts with an internet connection.
What needs to be reachable on the school network?
For activation and after every update, the computer must be able to reach our license server. Licenses in the Student Private Devices group check this at every startup. Computers in the Classroom and Teacher groups also run without internet between updates. If your school’s firewall restricts outgoing connections, we will send you the required addresses.
Can we deploy the software centrally, for example via Jamf or imaging?
Yes. For central deployment of already activated installations, we will send you instructions on request. For computers whose license you want to pass on to other students later, single licenses are the better choice.
Can the Asset Library be stored centrally for all users?
Yes. Download the Asset Library in the school account. The file must match the installed version of set.a.light 3D exactly. The version is in the file name, for example AssetLibrary-v3.1.14.pak for version 3.1.14. Copy the file once into the system-wide packages folder and remove the version from the name, so that it is called AssetLibrary.pak there:
- macOS: /Library/Application Support/elixxier/set.a.light/packages/
- Windows: C:\ProgramData\elixxier\set.a.light\packages\
The folder must be writable for all users, otherwise each user account creates its own copy. You can then distribute it to other computers with a deployment tool. After every update of set.a.light 3D, you need the matching new file. Distribute it together with the app.
How do updates get onto the computers?
Updates for one year are included. We provide new versions as installers, and you take care of distributing them to the school computers. After the first year, you can extend the updates; just get in touch with us. Without an extension, you can keep working with your version indefinitely.
Frequently asked questions
How many licenses do we need?
One per computer running set.a.light 3D. Even if the computers never all run at the same time, each one needs its own license.
Can we buy more licenses later?
Yes, simply in the same customer account. The new licenses appear in the license management under Unassigned.
What happens when a student leaves the school?
Release their license in the Student Private Devices group using Reassign. The old license is deleted and replaced with a new one, which you give to the next student.
A computer is defective or has been reinstalled. What should we do?
Reset the activation for this device in the school account. You can then activate the license on the new or reinstalled computer.
We still have set.a.light 3D V2.5 licenses. Can we switch to V3?
An upgrade to set.a.light 3D V3 is possible. Just get in touch with us.
Questions about the school account?
Write to us via the form or at support@elixxier.com. We are happy to help you with setup, installation and activation.
All personal data is processed in accordance with our privacy policy.
By sending the message, you accept it.